Most AI image tools give you one box and one model, so the only lever you have when a result disappoints is to rewrite the prompt and hope. That's the slowest possible way to work, because prompt wording is rarely what went wrong — picking the wrong model for the job usually is. This guide covers how to actually use an AI image generator for product and brand work: which mode fits which task, what the three models are genuinely good at, and the settings that change a result more than any adjective you can add.
Start by picking the mode, not the prompt
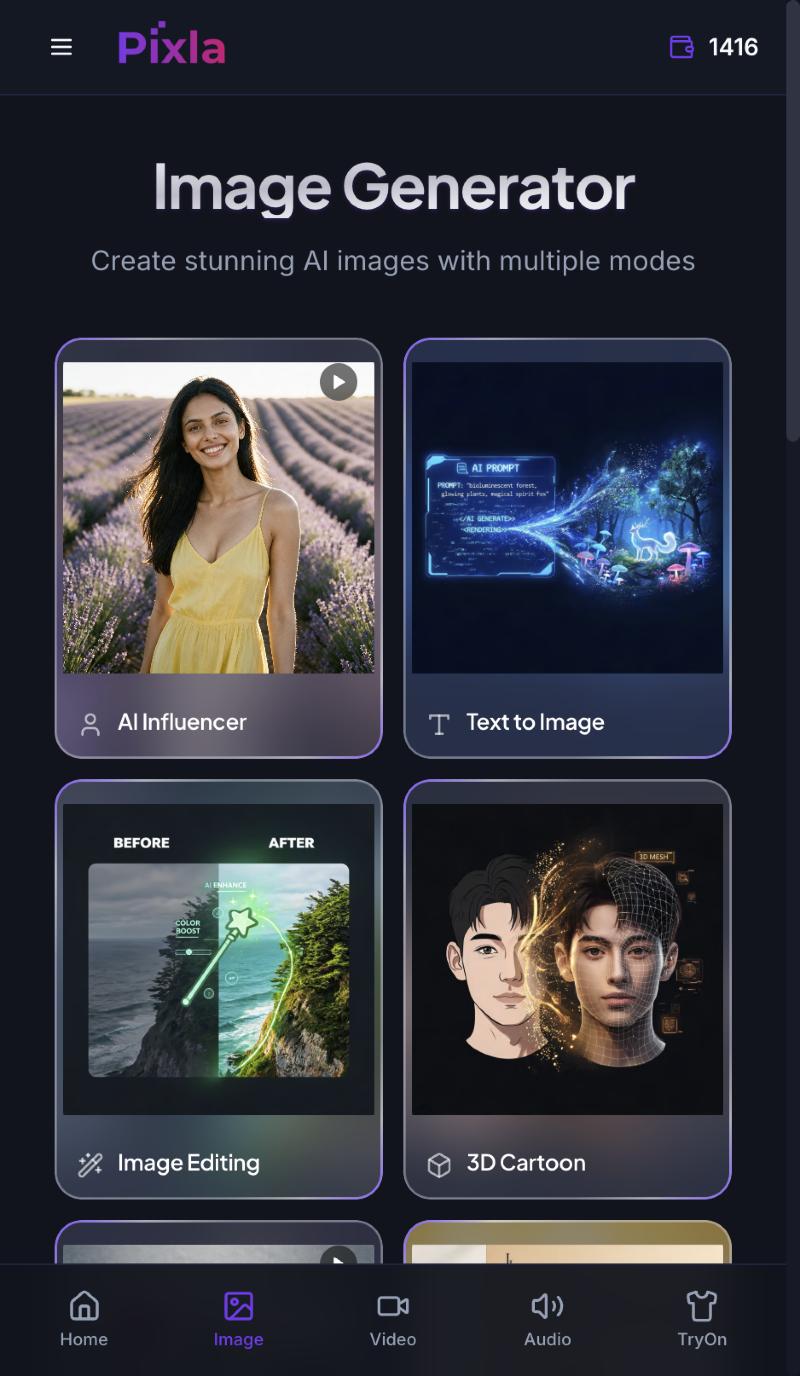
Open the Image Generator and the first screen is a set of modes rather than a prompt box. That ordering is deliberate and it's the single biggest time-saver in the tool, because each mode is a different pipeline with different inputs — not the same generator with a different preset bolted on.
- AI Influencer — generates a consistent person. Use it when the same face has to recur.
- Text to Image — a prompt and nothing else. The general-purpose mode, covered in detail below.
- Image Editing — change an image you already have instead of rolling a new one.
- 3D Cartoon — stylised character output rather than photoreal.
- Product in Hand — put a real product into someone's hand at believable scale.
- Creative Generator — produces an ad, with layout, headline and offer, not a bare image.
The mistake worth avoiding: trying to force Text to Image to do a job one of the other five already does. Asking a text prompt for "my product held in a hand" will get you a plausible product that isn't yours. Product in Hand takes your actual product photo. Same for ads — prompting for "an Instagram ad with a headline" produces a picture of an ad, with text that falls apart under inspection, where the Creative Generator produces a real one.
Choosing between the three models
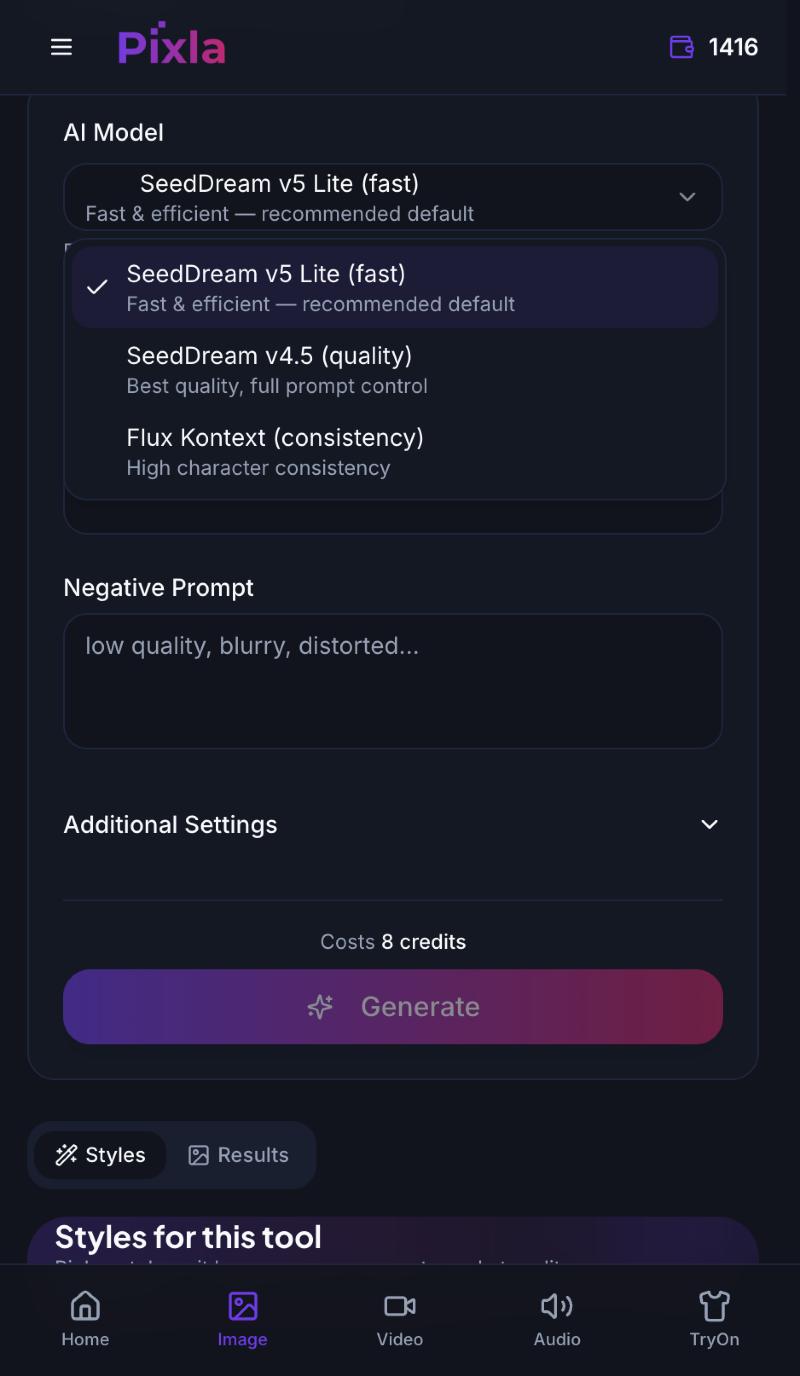
Inside Text to Image, the first field is the model — above the prompt, which is the right order to think in. There are three, and the labels tell you what each is tuned for rather than leaving you to guess from version numbers.
- SeedDream v5 Lite (fast) — the default, described in the tool as fast and efficient. This is the one to explore with. When you don't yet know what you want, you want many cheap attempts, not one expensive one.
- SeedDream v4.5 (quality) — best quality and full prompt control. Switch to it once a Lite result is nearly right and you want the finished version. Its advantage shows most on long, specific prompts, where the extra prompt control actually gets used.
- Flux Kontext (consistency) — high character consistency. The specialist. Reach for it when the same person or object must survive across several images, and ignore it otherwise, because consistency is not what you need when you are generating one thing once.
A workflow that beats prompt-fiddling almost every time: explore on Lite until the composition is right, then regenerate the keeper on v4.5. You get the cheap iteration and the good final frame, instead of paying quality rates for twenty exploratory attempts.
Writing a prompt that doesn't waste a generation
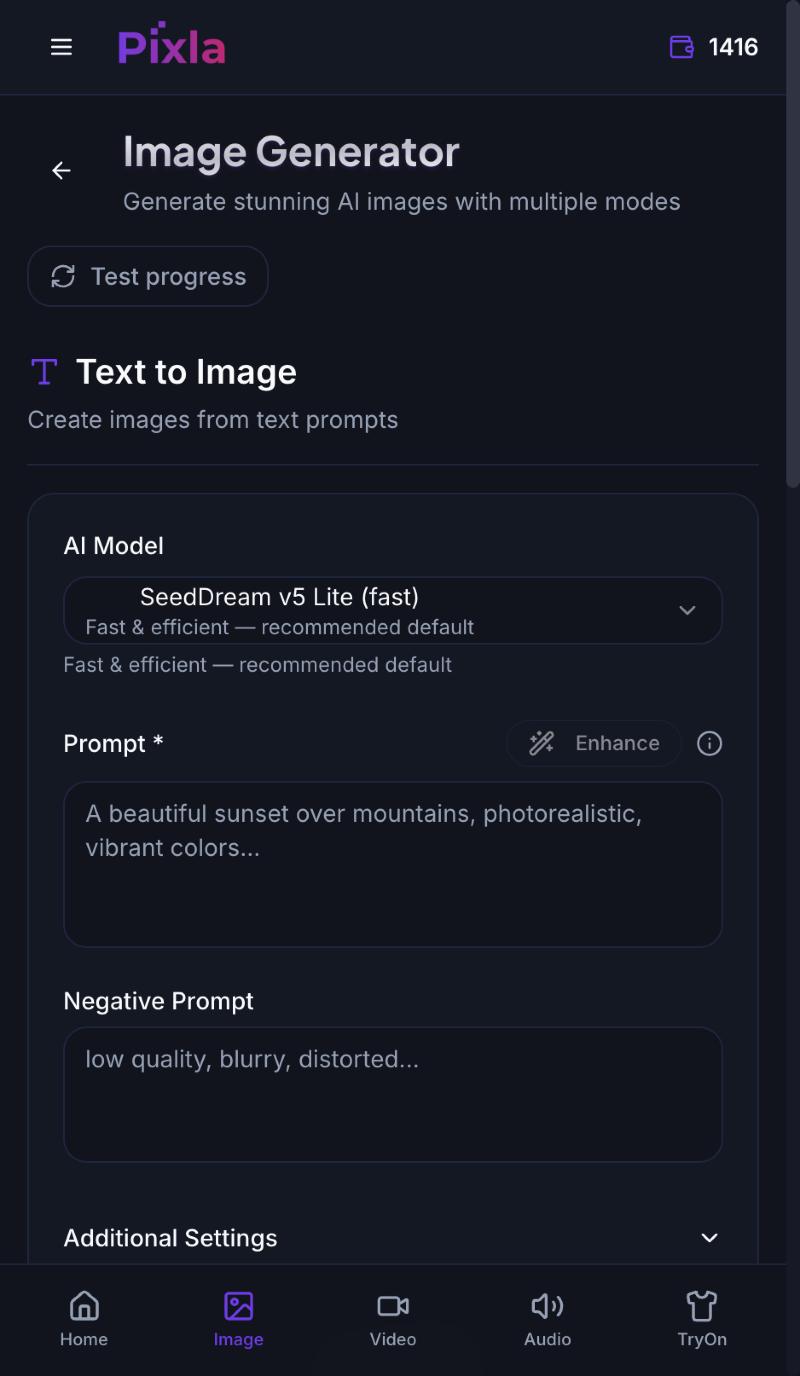
Prompts fail in predictable ways, and almost all of them come from describing a feelingrather than a photograph. The model cannot render "premium" or "eye-catching". It can render a lens, a light source, a surface and a background.
Work through four things, in this order:
- Subject — what is actually in frame, stated plainly and first.
- Setting — the surface and background it sits on or in.
- Light — direction and quality. "Soft light from the left, deep shadow on the right" does more work than any adjective you can add.
- Framing — close macro, three-quarter, wide. This decides composition, which is the thing you cannot fix later.
The Enhance button next to the prompt field expands a short prompt into a fuller one. It's genuinely useful as a starting point when you're stuck, with one caveat worth knowing: read what it produced before generating. It will sometimes add a detail you don't want, and it's far cheaper to delete a clause than to regenerate.
The negative prompt is for defects, not content
The Negative Prompt field is the most misused control in any image tool. It is for namingartefacts — the placeholder text in the tool says it plainly: low quality, blurry, distorted. It is not a second prompt where you list things you'd rather not see.
Putting subject matter in there tends to backfire, because naming a thing makes it salient whichever field you name it in. If you don't want a background, describe the background you dowant in the main prompt — "on a seamless white sweep" — rather than writing "no background" in the negative. Keep the negative field for quality defects and leave it alone otherwise.
Know the cost before you press Generate
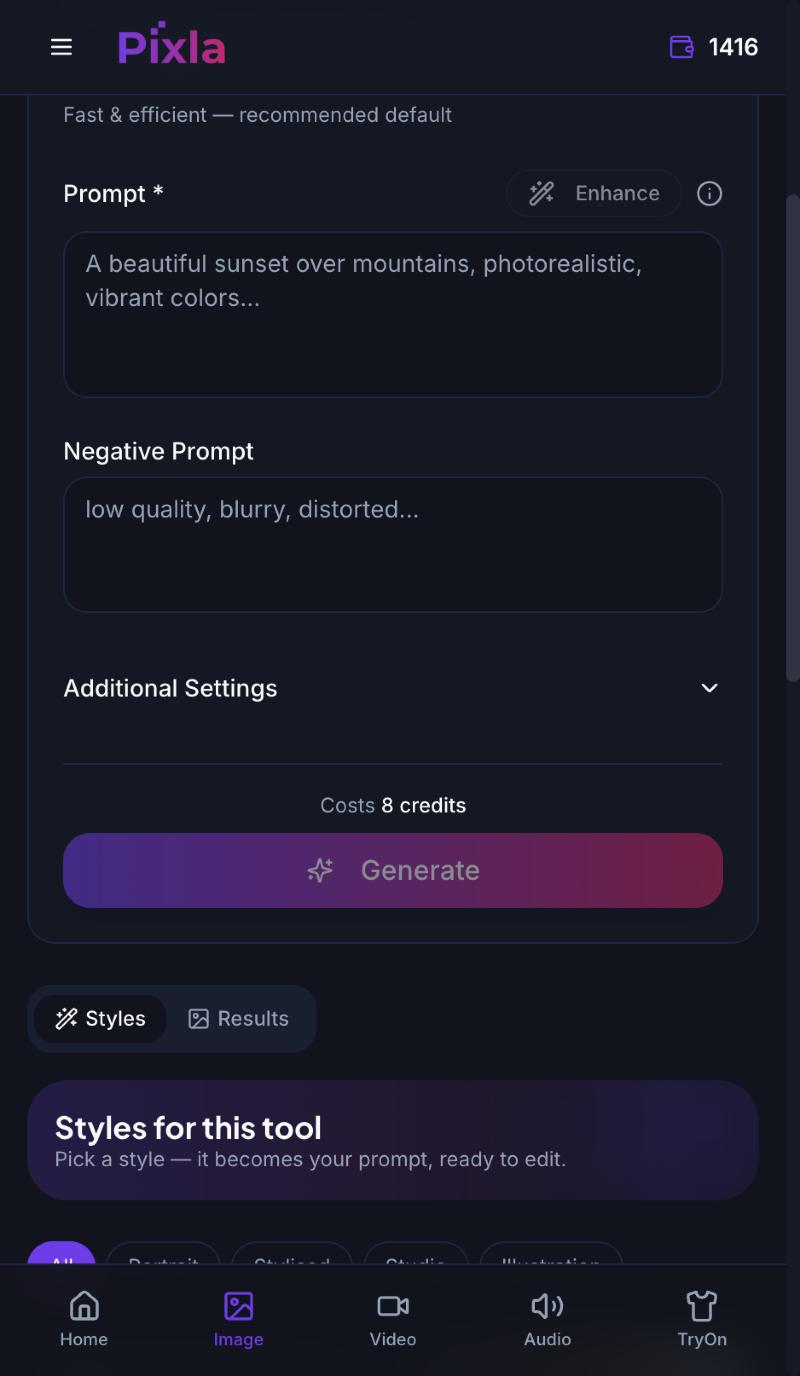
The cost is shown directly above the Generate button — 8 credits on the default settings — and it updates as you change them. That readout is the most useful number on the screen, because it turns an abstract worry about spend into a decision you make per generation.
Use it to budget deliberately rather than anxiously. If you have a batch of ten product shots to make, the cheapest route is almost never ten careful expensive attempts; it's a handful of cheap exploratory ones to find the composition, then the good model for the finals. Check pricing for current credit packs.
Use the style templates as a starting draft
Below the form is a Styles panel, filtered by Portrait, Stylised, Studio and Illustration. The important detail is in its own description: picking a style becomes your prompt, ready to edit. It is not a hidden filter applied on top of your words — it writes the prompt, and then you change it.
That makes the templates far more useful than preset buttons usually are, because you can read them. Cinematic Portrait resolves to teal shadows with a warm key. Neon Cyberpunk to rain, signage and night. Watercolour Wash to bleeding pigment and paper grain. Loading one and reading the prompt it produced is the fastest way to learn how specific a working prompt actually is — considerably more specific than most people write unaided.
Where results go
The Results tab beside Styles shows the latest ten generations, with everything older in the Gallery. Worth knowing before you go looking for something from last week and conclude it vanished — the panel is a recent-work strip, not an archive.
A workflow that holds up
- Pick the mode that matches the job. If a specialised mode exists for what you want, it will beat a text prompt every time.
- Load a style template near your target and read the prompt it wrote.
- Edit it to your subject, setting, light and framing. Replace its subject with yours and keep its structure.
- Explore on Lite. Several cheap attempts, judging composition rather than polish.
- Regenerate the keeper on v4.5 for the finished frame.
- Switch to Flux Kontext only when the same subject has to recur across images.
- Fix rather than reroll. If one element is wrong and the rest is right, Image Editing is cheaper than regenerating and losing the composition you liked.
Where to go next
If the images are for ads, the AI creative generator produces ad-shaped output directly. If they're product shots for a storefront, the product photo generator is built for catalogue consistency. And if the same person needs to appear across a whole campaign, start with creating an AI influencer rather than fighting prompt-level consistency.
Frequently asked questions
How do I use an AI image generator?
Pick the mode that matches the job before writing anything — Text to Image, Image Editing, Product in Hand and the others are separate pipelines, not presets. Then choose a model, write a prompt describing a photograph rather than a feeling (subject, setting, light, framing), check the credit cost shown above the Generate button, and generate.
Which AI model should I choose for image generation?
SeedDream v5 Lite is the fast default and the right one for exploring, since early attempts are about finding a composition rather than polish. SeedDream v4.5 gives best quality and fuller prompt control, so switch to it for the final version. Flux Kontext is the specialist for high character consistency, worth using only when the same subject must recur across several images.
What should go in the negative prompt?
Quality defects only — low quality, blurry, distorted. It is not a second prompt for listing unwanted content; naming a thing tends to make it salient whichever field it appears in. If you do not want a particular background, describe the background you do want in the main prompt instead.
How much does one AI image cost?
The cost appears directly above the Generate button and updates as you change settings — 8 credits on the default configuration. Because it is shown per generation, the practical approach is to explore with the fast model and reserve the quality model for finals rather than paying quality rates for exploratory attempts.
What do the style templates actually do?
They write your prompt. Picking a style loads it into the prompt field ready to edit, rather than applying a hidden filter on top of your words. Reading what a template produced is the quickest way to see how specific a working prompt needs to be.