A still image makes an AI influencer look real. A talking video makes it convincing — or exposes it instantly. The gap between those two outcomes is almost never the model; it's the script, the voice pairing, and whether you told the system what the presenter should be doing while they talk. This guide covers the whole production in Pixla's UGC Video Studio, including the separate dubbing path most people don't realise exists.
What you need before you open the studio
One thing: a presenter. Either a saved character from the character build, one of the free Featured Influencers, or an uploaded face you have the rights to use. Everything else is decided inside the studio.
Step 1: Pick your presenter
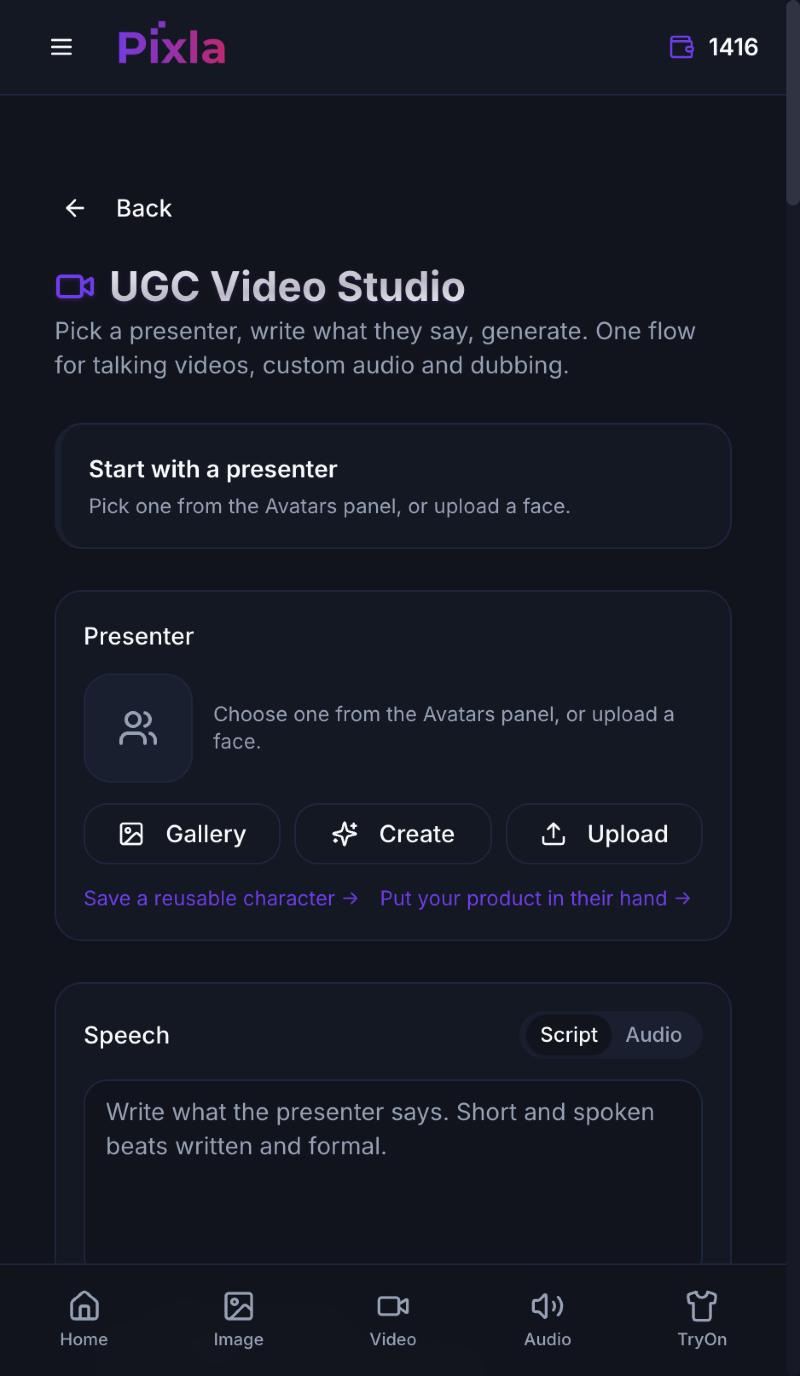
Open UGC Video Studio. The Presenter panel gives you three ways in — Gallery to pick from avatars and your saved characters, Create to build one now, or Upload to bring your own face.
If you're making more than one video with this persona, use a saved character rather than an upload. An uploaded face is a one-off; a saved character is the same person in every video you make from here on, which is the only way a series reads as a series.
Step 2: Write a script that survives being spoken
The Speech box carries the hint that matters most: short, spoken beats, not written and formal. Copy that reads fine on a landing page falls apart out loud, because written English is denser than anyone actually speaks.
What consistently works:
- Earn the first two seconds. Lead with the problem or the result, never with a greeting. "Hi guys, so today I wanted to talk about…" is where retention goes to die.
- One idea per video. A 15-second clip holds roughly 35–45 spoken words. Trying to land three benefits in that space lands none of them.
- Read it out loud before you paste it. If you run out of breath, the model will sound like it ran out of breath too.
- Contractions and short sentences. "It's" not "it is". Full stops over commas — they give the voice somewhere to breathe.
- Finish with one instruction. One call to action, stated plainly.
The script field takes up to 5,000 characters, but treat that as a ceiling, not a target. The strongest social videos in this format sit far below it.
Step 3: Choose the voice deliberately
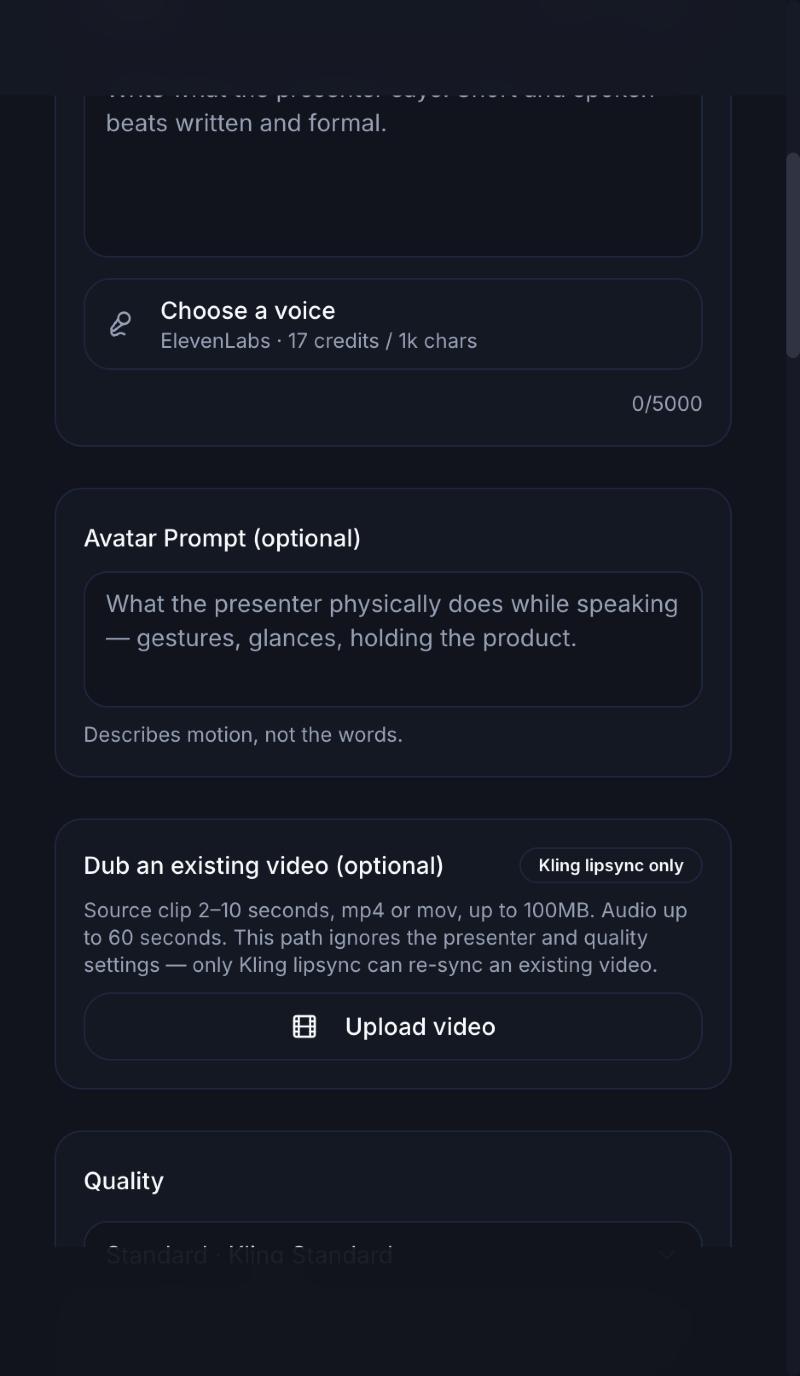
If the character has a default voice, it's already applied, and you can override it here per generation. ElevenLabs voices are priced at 17 credits per 1,000 characters, which is worth knowing because it means voice cost scales with script length rather than video length — another reason tight scripts pay off twice.
Pair the voice to the content, not just the face. A product demo wants clarity and pace. A personal recommendation wants warmth and a slightly slower read. Getting this wrong is the most common reason a technically clean video still feels synthetic.
Step 4: Use the Avatar Prompt for motion, not words
This is the field people leave blank, and it's the one that separates a talking head from something that looks filmed. The studio states the rule explicitly: it describes motion, not the words. It's for what the presenter physically does while speaking — gestures, glances, holding the product.
Be concrete and physical. "Holds the bottle up near the shoulder, glances down at it, then back to camera" gives the model something to animate. "Looks confident and engaging" gives it nothing. If the product should appear on camera, say when and where in the shot.
Step 5: Know which path you're on — generate or dub
There are two different jobs in this one screen, and mixing them up wastes a render.
- Generating a new video — presenter plus script plus voice plus motion. This is the default path and the one that uses your quality setting.
- Dubbing an existing video — you upload a clip of 2 to 10 seconds (mp4 or mov, up to 100MB) with audio up to 60 seconds, and it gets re-synced to new speech. This path ignores the presenter and quality settings entirely, because only Kling lipsync can re-sync footage that already exists. If you upload a video here, your presenter choice above is irrelevant — which is exactly the confusion worth avoiding.
Dubbing is the right tool for localising a clip that already performs. Generation is the right tool for everything new.
Step 6: Generate, then actually watch it
Set quality, generate, and then review the result properly before it goes anywhere. Four things to check, in this order, because the first failure makes the rest moot:
- Lip sync through the whole clip, not just the opening line — drift usually shows up late.
- Pacing — if it sounds rushed, the script is too long for the duration. Cut words rather than slowing the voice.
- Hands and product — the most common artefacts live here, especially where a hand meets an object.
- The first frame — it's your thumbnail whether you chose it or not.
Where something's off, change one variable and regenerate. Changing script, voice and motion together tells you nothing about which one was the problem.
Making a series instead of a clip
One video is a test. The value shows up when the same persona posts consistently, and the workflow changes slightly at that point:
- Lock the character and the voice and stop changing them. Consistency is the product.
- Vary the hook, hold the format. Same persona, same length, same structure, different opening line — that's a testable series.
- Write scripts in batches. Ten scripts in one sitting are more consistent in voice than ten written across three weeks.
- Keep the winners. When a hook performs, dub it into other languages rather than rebuilding it from scratch.
What it costs
Voice is charged by script length — ElevenLabs at 17 credits per 1,000 characters — and the video render is charged by quality and duration. Because the two scale on different axes, the cheapest meaningful improvement is almost always a tighter script: it reduces voice cost and improves retention at the same time. Current packs are on pricing.
Where to go next
Once the videos are landing, the question becomes what they're for. How to monetize an AI influencer covers turning a working persona into ad creative and revenue.
Frequently asked questions
How do I make an AI influencer video?
In UGC Video Studio, pick a presenter (a saved character, a featured avatar, or an uploaded face), write a short spoken script, choose a voice, describe what the presenter physically does in the Avatar Prompt, set quality, and generate. Reviewing lip sync across the whole clip before publishing catches most problems.
How long should an AI influencer video script be?
Far shorter than most people write. A 15-second clip holds roughly 35 to 45 spoken words, so one idea per video. The field accepts up to 5,000 characters, but that is a ceiling rather than a target — tight scripts both retain better and cost less, since voice is billed per 1,000 characters.
What is the Avatar Prompt for?
Motion, not words. It describes what the presenter physically does while speaking — gestures, glances, holding the product. Concrete physical direction such as "holds the bottle near the shoulder, glances down, then back to camera" animates well; abstract direction like "looks confident" does not.
Can I dub a video I already have?
Yes. Upload a clip of 2 to 10 seconds (mp4 or mov, up to 100MB) with audio up to 60 seconds and it is re-synced to new speech. Note that this path ignores the presenter and quality settings, because only Kling lipsync can re-sync existing footage — it is for localising clips that already work, not for making new ones.
Why does my AI influencer video look fake?
Usually one of three things: a script written to be read rather than spoken, a voice that does not match the content type, or an empty Avatar Prompt leaving the presenter with nothing to do but talk. Change one variable at a time when regenerating so you learn which one was at fault.